Summary of Contents
Page 1
part# MG977526 USE+MAINTENANCE BOOK.
Page 2: Safety Warnings, Technical Information, Warnings – Precautions – General Advice
On behalf of: Moto Guzzi S.p.A. via E. V. Parodi, 57 23826 Mandello del Lario (LECCO) – Italy Tel. +39 – 0341 70 91 11 Fax +39 – 0341 70 92 20 www.motoguzzi.it use and maintenance Norge 1200.
Page 3
Page 4: Table Of Contents
CLUTCH FLUID – RECOMMENDATIONS. 41 ADJUSTING THE THROTTLE CONTROL. 77 CLUTCH. 42 SPARK PLUGS. 77 TYRES. 43 CHECKING THE STAND. 79 ENGINE OIL. 45 BATTERY. 81 ADJUSTING THE FRONT BRAKE LEVER AND use and maintenance Norge 1200.
Page 6: Basic Safety Rules
– do not ride driving. number plate, etc.). if you are feeling ill, upset, tired or sleepy. Begin to familiarise yourself with the vehicle by riding in low traffic areas and/or private ground. use and maintenance Norge 1200.
Page 7
Page 8
If in doubt, have the vehicle inspected at a Moto Guzzi Authorised Dealer and ask t h e m t o c a r e f u l l y c h e c k t h e f r a m e.
Page 10: Accessories, Load
Moto Guzzi recommends that you only use angle in a bend. genuine Moto Guzzi accessories. Avoid using accessories that may hamper.
Page 11
Do not secure bulky bags to the vehicle Do not carry pets or children sitting on the sides, as they could hit people or obstacles glove compartment or on the luggage rack. when riding, resulting in loss of control. use and maintenance Norge 1200.
Page 12: Position Of Key Components – Key
5) Fuel tank 12) Rear phonic wheel 19) Side stand 6) Left side body panel 13) Left passenger footpeg 20) Engine oil dipstick 7) ABS fuse carrier 14) Seat lock 21) Fairing lug (if fitted) use and maintenance Norge 1200.
Page 13
18) Rear side panel (if fitted) 5) Right side body panel 12) Rear brake lever 19) Side panniers (if fitted) 6) Rear brake fluid reservoir 13) Right rider footpeg 7) Air filter 14) Cardan shaft use and maintenance Norge 1200.
Page 14: Location Of Instruments/controls
11) Turn indicator switch (6) 4) Front brake lever 12) MODE switch 5) Throttle grip 13) (ABS) disabling switch 6) Hazard button ( ) 7) Engine run/kill switch ( – – ) 8) Dimmer switch ( use and maintenance Norge 1200.
Page 15: Instruments And Indicators
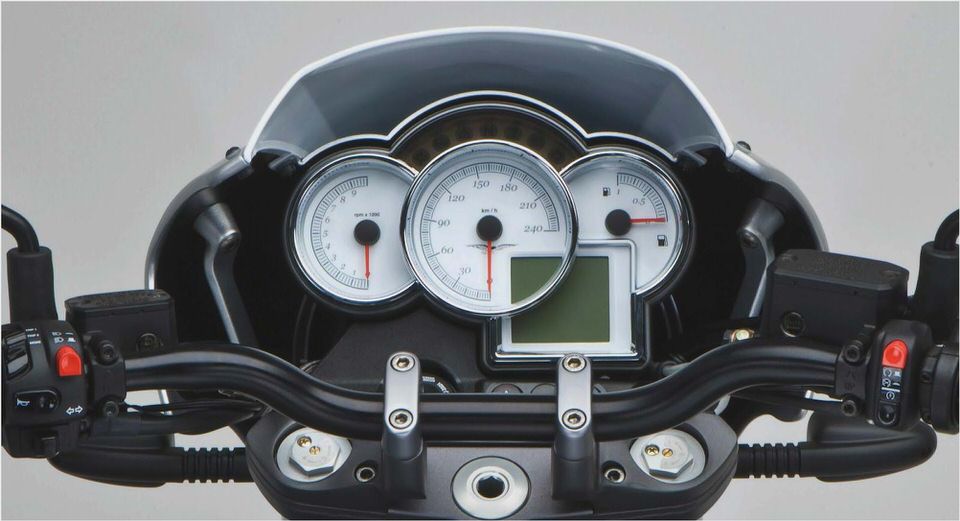
4) Green neutral light ( indicator) 5) Amber stand down light ( 9) Speedometer 6) Blue high beam warning light ( 10) Rev counter 7) Amber low fuel warning light ( 11) Fuel level indicator use and maintenance Norge 1200.
Page 16: Instruments And Indicators Table
Besides the light coming on, after 2 Km, the multifunction LCD display shows the distance covered since the fuel reserve started being used. When the light comes on, refuel as soon as possible, see page 34 (FUEL). Continued use and maintenance Norge 1200.
Page 17
Heated handgrips switch (if fitted) With engine running, press for several seconds to activate handgrips heating. Press briefly to adjust heating. Press again for several seconds to turn heating off.
See page 28 (CONTROLS ON THE DASH PANEL). use and maintenance Norge 1200.
Page 18: Multifunction Lcd Display
(1) to position UP Turn the key to , the display will show or DOWN. the starting page with Moto Guzzi To reset all the trip values for the selected wording for 2 seconds. TRIP The display will carry out a starting check.
Page 19
#x221A; VIEW TIMES #x221A; DELETE TIMES; Options can be selected in a sequence by briefly pressing the selector (1). To exit this function, confirm the EXIT option by pressing the selector (1) for several seconds. use and maintenance Norge 1200.
Page 20
To scroll the pages: Briefly press the selector (1). To go back to LAP TIMER: Press the selector (1) for several seconds. use and maintenance Norge 1200.
Page 21
(1). #x221A; IMMOBILIZER LED threshold value currently set. #x221A; CHANGE THE CODE Options can be selected in a sequence by briefly pressing the selector (1). use and maintenance Norge 1200.
Page 22
Allows the user to change his personal To store the set level and go back to (1). code. During the procedure the user is SETTINGS function: prompted to enter the old code. press the selector (1) for several seconds. use and maintenance Norge 1200.
Page 23
#x221A; ENGLISH #x221A; FRANCAIS #x221A; DEUTSCH #x221A; ESPAGNOL The languages can be selected by briefly pressing selector (1). To store the set unit and go back to LANGUAGE function: press the selector (1) for several seconds. use and maintenance Norge 1200.
Page 24
– u p. t h e #x221A; High priority: ODOMETER can be viewed this way as Oil pressure, Errors from control unit, well. Errors from instrument panel. use and maintenance Norge 1200.
Page 25: Location Of Accessories (if Any)
LOCATION OF ACCESSORIES – KEY 1) lower fairing lug 2) Tom Tom satellite navigation system 3) heated handgrips 4) side body panel 5) rear side body panel 6) Plug-in socket 7) side panniers kit 8) top case use and maintenance Norge 1200.
Page 26: Accessories (if Any)
Please see the attached user’s manual 5) REAR SIDE BODY PANEL for instructions on the use of the Tom To remove the rear side body panel, Tom navigation system. see page 47 (REMOVING THE REAR LEFT SIDE BODY PANEL). use and maintenance Norge 1200.
Page 27: Main Independent Controls
53 (STARTING) for the starting turning right. procedure. Push in to cancel the indicators after Set it to position to stop the engine. turning. WARNING Do not set the switch to while riding. use and maintenance Norge 1200.
Page 28: Controls On The Dash Panel
After about three seconds the light on the instrument panel will start blinking. Immediately release push-button (1). Now the ABS light on the panel will carry on blinking slowly meaning that the ABS is completely disabled. use and maintenance Norge 1200.
Page 29: Ignition Switch, Steering Lock
G u z z i A u t h o r i s e d D e a l e r f o r t h i s NOTE If necessary, turn on the parking procedure. lights, see page 30 (PARKING LIGHTS). Remove the key. use and maintenance Norge 1200.
Page 30: Parking Lights
If this is not possible, the parking lights are useful whenever it is necessary to park in a dark or poorly lit area and in any case to make the vehicle more visible. use and maintenance Norge 1200.
Page 31: Auxiliary Equipment, Unlocking/locking The Seat, Glove/tool Kit Compartments
T o g a i n a c c e s s t o t h e t o o l k i t seat (2), make sure that you have not left (2) is properly locked. compartment: the key in the glove/tool kit compartments. Remove the cover (3). Remove the bag (4) from its seat. use and maintenance Norge 1200.
Page 32: Luggage Anchor Points
(10). Maximum allowed weight: 5 kg. WARNING Carry small luggage only and make sure it is fastened securely. use and maintenance Norge 1200.
Page 33: Windscreen Adjustment
Manually adjust the windscreen position as follows: #x221A; support the windscreen and, working on either side, loosen the two knobs (1). #x221A; set desired windscreen position. #x221A; support the windscreen and, working on either side, tighten the two knobs (1). use and maintenance Norge 1200.
Page 34: Main Components, Fuel
Close the flap (1). receptacles using a hose. Refuel. D O N O T R E L E A S E F U E L I N T H E ENVIRONMENT. KEEP AWAY FROM CHILDREN. use and maintenance Norge 1200.
Page 35: Brake Fluid – Recommendations
Authorised Dealer in case you have any not to spill it on plastic or painted parts, doubts on the operation of the braking or they will damage. system and in case you are not able to carry out the normal checks. use and maintenance Norge 1200.
Page 36: Disc Brakes
Have brake fluid changed every two pads wear down. Have the brake fluid changed every 20000 years by a Moto Guzzi Authorised The front brake reservoir is located on the km (12500 mi) or every two years by a Dealer.
Page 37: Front Brake
Do not add any additives or other If the pads and/or the disc do not need products to the fluid. replacing, top up fluid level. If you use a funnel or other tools, make sure that they are perfectly clean. use and maintenance Norge 1200.
Page 38: Rear Brake, Topping Up
Avoid prolonged exposure of brake fluid to air. Brake fluid is hygroscopic and will absorb moisture from the air. Keep the brake fluid reservoir open JUST LONG ENOUGH to top up level.
Unscrew and remove the plug (2). use and maintenance Norge 1200.
Page 39
I f t h e l i g h t s s t a y s o n p e r m a n e n t. a can feel a vibration in the brake lever. malfunction was detected and ABS is disabled. In this case it is advisable to contact a Moto Guzzi Authorised Dealer. use and maintenance Norge 1200.
Page 40
(2), see page 28 (CONTROLS ON THE DASH PANEL). WARNING With the ABS system, brake pad quality is important; do not use non-approved friction materials or braking efficiency would be impaired and the vehicle would not be safe. use and maintenance Norge 1200.
Page 41: Clutch Fluid – Recommendations
42 (CLUTCH), have it When handling clutch fluid, take care hardness in the clutch lever are warning changed every two years by a Moto Guzzi not to spill it onto plastic or paint- signs of problems with the hydraulic Authorised Dealer.
Page 42: Clutch
Every 10000 km (6250 mi) have the clutch inspected by a Moto Guzzi Authorised Dealer. CHECK CAUTION Place the vehicle on the stand, see page Danger: clutch fluid could leak out.
Page 43: Tyres
Conversely, under-inflation will put more NOTE As a reference to obtain #x2248;MAX#x2206; a Moto Guzzi Authorised Dealer, as the stress on the sidewalls (1) and the tyre level, top up until fluid completely covers system may need bleeding.
Page 44
For more information on how used. to check the tyres for wear, contact your Dealer. Visually inspect the tyres for wear and have them changed if worn. use and maintenance Norge 1200.
Page 45: Engine Oil, The Clutch Lever, Adjusting The Front Brake Lever And
OIL LEVEL), should it be incorrect, and page 68 (CHANGING ENGINE OIL immediately stop the engine and contact a Moto Guzzi Authorised dealer. AND OIL FILTER). NOTE Use high quality oil, see page 99 (LUBRICANT CHART). use and maintenance Norge 1200.
Page 46: Catalytic Silencer, Exhaust Muffler/exhaust Silencer
This device provides for the oxidation of the CO (carbon monoxide) and of the HC (unburned hydrocarbons) contained in the exhaust gases, changing them into carbon dioxide and steam, respectively. use and maintenance Norge 1200.
Page 47: Outer Structures, Removing The Rear Left Side Body Panel, Removing The Right Side Body Panel
Working on the left side, loosen and Loosen and remove the screw (4) and remove the screw opposite to screw (7). collect T-shaped bushing. Remove the lug. Remove the rear left side body panel. use and maintenance Norge 1200.
Page 48: Removing The Left Side Body Panel, Lifting The Dash Panel
(14). Loosen and remove the screw (11) and collect T-shaped bushing, two rubber CAUTION blocks and washer. Proceed carefully to avoid damaging Remove the left side body panel. the top retainer tabs. use and maintenance Norge 1200.
Page 49: Instructions For Use, Getting On And Off The Vehicle
Always get on and off the vehicle from the vehicle may fall or overturn. passenger is mounting or dismounting. left side and with the side stand down. use and maintenance Norge 1200.
Page 50
GETTING OFF THE VEHICLE Make sure that the vehicle is stable. the rear of the vehicle can represent an Select appropriate location obstacle while getting on and off. parking, see page 59 (PARKING). Stop vehicle, page (STOPPING). use and maintenance Norge 1200.
Page 51: Pre-ride Checks
CHART). during engine normal operation, it Do not hesitate to contact your Moto Guzzi m e a n s t h a t t h e c o n t r o l u n i t h a s Authorised Dealer if you need clarifications detected a failure.
Page 52: Pre-ride Checks Chart
89, 90 rear brake light switches and electrical devices Transmission fluid Check. If level needs topping up, contact a Moto Guzzi Authorised Dealer. Phonic wheels Ensure that the phonic wheels are perfectly clean 39 (ABS) use and maintenance Norge 1200.
Page 53: Starting
#x221A; the parking lights come on; #x221A; all warning lights on the instrument panel come on; #x221A; the LCD will show Moto Guzzi wording for 2 seconds; Do not start the engine in an enclosed #x221A; the speed indicator and fuel gauge STARTING space or poorly ventilated area.
Page 54
In most cases, the the control unit will manage the starting engine will keep running, although procedure on its own. giving less performance. Immediately contact a Moto Guzzi Authorised #x221A; The low beam comes on. Dealer. use and maintenance Norge 1200.
Page 55: Moving Off And Riding
If the low fuel warning light (1) on the instrument panel comes on when riding, it means that there are 4 litres of fuel left in the tank. use and maintenance Norge 1200.
Page 56
In this instance, immediately stop the engine and contact a Moto Guzzi Authorised dealer. Change to a lower gear (downshift): When riding downhill or when braking, use engine braking to increase braking effect.
Page 57
In most cases, the engine will keep running, although giving less performance. Immediately contact a Moto Guzzi Authorised Dealer. use and maintenance Norge 1200.
Page 58: Running-in
Watch out for obstacles or sudden After the first 1000 km (625 mi), have a ensuring proper performance and durability. Moto Guzzi Authorised dealer carry out changes in the road surface. Twisty, hilly roads are ideal for an effective the Post running-in checks specified in running-in of engine, suspension and brakes.
Page 59: Stopping, Parking
Do not apply the load of your weight or (4). of the passenger#x2019;s weight onto the side If you need to stop only briefly, keep at WARNING least one brake applied. stand. Make sure that the vehicle is stable. use and maintenance Norge 1200.
Page 60: Putting The Vehicle On The Stand
59 (PARKING). For your safety, the side stand down Grasp the left grip (1) and place your condition is indicated to avoid vehicle right hand on the rear upper part of the tipping over. vehicle (2). use and maintenance Norge 1200.
Page 61
Proceed with care. The positioning of the vehicle on the centre stand may be difficult, since the vehicle is very heavy. Release the handgrip (1) and handle (4) only when the vehicle is steady on the stand. use and maintenance Norge 1200.
Page 62: Suggestions To Prevent Theft, Maintenance
Ask your Moto Guzzi Authorised Dealer to When possible, use an additional antitheft components.
Page 63: Scheduled Maintenance Chart
SCHEDULED MAINTENANCE CHART OPERATIONS TO BE CARRIED OUT BY THE Authorised Dealer Moto Guzzi (CAN ALSO BE CARRIED OUT BY THE OWNER). Component End of running-in Every 10000 km Every 20000 km [1000 km (625 mi)] (6250 mi) or 12 months.
Page 64
OPERATIONS TO BE CARRIED OUT BY THE Moto Guzzi Authorised Dealer. Component End of running-in Every 10000 km Every 20000 km [1000 km (625 mi)] (6250 mi) or 12 months (12500 mi) or 24 months Gearbox fluid Idle mixture (CO)
Page 65
Halve maintenance intervals if you are riding in rainy or dusty conditions, on rough road surfaces or when the vehicle is used for racing. (*) = If vehicle is used for racing, check every 5000 km (3125 mi). use and maintenance Norge 1200.
Page 66: Identification Data, Joints With Screw Clamps
, engine numbers in the space provided in left side close to the oil level plug/dipstick. available on request from Moto Guzzi this manual. Authorised Dealers.
Page 67: Checking And Topping Up Engine Oil Level
CAUTION level drop below the MIN mark, as this The engine oil level must be checked may lead to severe engine damage. with a warm engine and with the oil level dipstick (1) not tightened. use and maintenance Norge 1200.
Page 68: Changing Engine Oil And Oil Filter
Do not add any additives or other best left to experienced mechanics. products to the oil. If necessary, contact your Moto Guzzi If you use a funnel or other tools, make Authorised Dealer. sure that they are perfectly clean.
Page 69: Front Wheel
CAUTION Disassembling and reassembling the front wheel may prove difficult; these operations are best left to experienced mechanics. If necessary, contact a Moto Guzzi Authorised Dealer. WARNING Riding with damaged rims may be Unscrew oil filter (3) and remove it.
Page 70: Rear Wheel, Front Brake Calliper
If necessary, contact a Moto Guzzi Have someone keep the handlebar steady in a position as for riding, so that Authorised Dealer. the steering is locked.
Page 71: Checking The Cardan Shaft Oil Level, Checking Gearbox Fluid Level
On assembly, replace both calliper retaining screws (1) with new ones of To check, top up and change gearbox CHECKING THE CARDAN SHAFT the same type. oil, contact a Moto Guzzi Authorised OIL LEVEL Dealer. Screw and tighten the two calliper NOTE Halve maintenance intervals if retaining screws (1).
Page 72: Rear-view Mirrors
Slide up and remove the complete rear- keep the reflecting surface clean, and view mirror unit. ensure proper visibility. Repeat the procedure to remove the other mirror, if necessary. use and maintenance Norge 1200.
Page 73: Inspecting The Front And Rear Suspensions, Front Suspension
(MAINTENANCE). Moto Guzzi Authorised Dealer. NOTE Have the front fork oil changed by a Moto Guzzi Authorised Dealer, who will ensure prompt, accurate service.
NOTE Halve maintenance intervals if you are riding in rainy or dusty conditions, on rough road surfaces or when the vehicle is used in competitions.
Page 74: Rear Suspension
1 0 0 0 0 k m ( 6 2 5 0 m i ) a n d a d j u s t a s required. Standard rear shock absorber setting is made to suit most riding conditions at low and high speed, for carrying the rider with luggage. use and maintenance Norge 1200.
Page 75
Click from completely Click from completely Turns from completely discharged (soft) preloaded (screw preloaded completely closed) standard 8 (std) 14 (std) 8.5 (std) medium load 8.5 (std) maximum load 8.5 (std) std = standard factory calibration use and maintenance Norge 1200.
Page 76: Checking The Brake Pads For Wear
(2). To have them replaced, contact your The rate at which brake pads will wear Moto Guzzi Authorised Dealer. depends on vehicle usage, riding style and road surface condition. use and maintenance Norge 1200.
Page 77: Adjusting The Throttle Control, Spark Plugs
Have the throttle control cables checked by a Moto Guzzi Authorised Dealer after the first 1000 km (625 mi) and then every 10000 km (6250 mi). If not so.
Page 78
Always change a spark plug which has a cracked insulator, corroded electrodes, excessive deposits or when the tip (8) of the central electrode (5) is rounded from wear. use and maintenance Norge 1200.
Page 79: Checking The Stand
The stand should turn smoothly. vibration. The springs (3) keep the stand in the NOTE Repeat the above procedure for desired position (extended or retracted). the spark plug of the other cylinder. use and maintenance Norge 1200.
Page 80
The stand should turn smoothly: smear Push down the gear shift lever (7) to the joint with grease, if necessary, see engage the first gear. page 99 (LUBRICANT CHART). Lower the side stand (1) to operate the safety switch (4). use and maintenance Norge 1200.
Page 81: Battery, Long Inactivity Of The Battery, Checking And Cleaning The Terminals
This vehicle is fitted with a If you are leaving the battery installed to maintenance-free battery which seldom the vehicle, disconnect the cables from the needs inspecting, but may need charging terminals. from time to time. use and maintenance Norge 1200.
Page 82: Removing The Battery
Carefully read page 81 (BATTERY). Make sure that the ignition switch is in position #x2248; #x2206;. Remove the rider seat, see page 31 (UNLOCKING/LOCKING THE SEAT).
Loosen the two screws (1) and move aside the cover (2). use and maintenance Norge 1200.
Page 83: Checking Battery Fluid Level, Charging The Battery
Allow 5-10 minutes before refitting the battery. Place the battery on a flat surface, in a cool and dry place. use and maintenance Norge 1200.
Page 84: Installing The Battery, Checking The Switches
(+) first and then the negative info and lap times. To re-set these cable (-). f u n c t i o n s. s e e p a g e (MULTIFUNCTION LCD DISPLAY). use and maintenance Norge 1200.
Page 85: Changing The Fuses
This could damage the electric system or cause a short circuit, with the risk of fire. NOTE If a fuse blows repeatedly, there might be a short circuit or an overload in the electric system. use and maintenance Norge 1200.
Page 86
ABS (10A). (MULTIFUNCTION LCD DISPLAY). cause of the failure if possible. NOTE There are three spare fuses (3, Replace the blown fuse with a new one 15, 20 A). with equal current rating. use and maintenance Norge 1200.
Page 87: Beam Setting
Switch on the low beam, sit astride the vehicle and make sure that the light spot on the wall is just below the horizontal line of the headlight (about nine/tenths of overall height). use and maintenance Norge 1200.
Page 88: Bulbs
Check beam correct horizontal setting s u b s t a n c e s a w a y f r o m e l e c t r i c and install the dash panel. components. use and maintenance Norge 1200.
Page 89: Changing The Headlight Bulbs
(6). Connect connectors (5) and refit the DO NOT PULL ON THE WIRES. rubber protection (4). NOTE Before changing a bulb, check Install the dash panel. the fuses, see page 85 (CHANGING THE FUSES). use and maintenance Norge 1200.
Page 90: Changing The Front And Rear Turn Indicator Bulbs
Unscrew and remove the screw (9). equal rating. Reinstall the lamp holder (7) in its seat. CAUTION While removing the lens, proceed carefully in order not to break the locating peg.
Remove the lens (10). use and maintenance Norge 1200.
Page 91: Changing The Tail Light Bulb, Replacing The Number Plate Bulb
BULB Press the bulb slightly and rotate it Since this operation is quite complex, have anticlockwise. it performed by a Moto Guzzi Authorised Extract the bulb from its seat. Dealer. CAUTION Insert the bulb into the bulb holder, so that the two pins slide into the slots in the holder.
Page 92: Transport, Draining The Fuel Tank
During transport, the vehicle must be firmly secured in an upright position to avoid fuel, oil and coolant leaks. If stranded, do not have the vehicle towed – contact a roadside service firm instead. use and maintenance Norge 1200.
Page 93: Cleaning
CAUTION and fairings. Avoid parking the vehicle under trees. Before washing the vehicle Resins, fruits or leaves falling from the trees may contain chemical substances that may damage the paintwork. use and maintenance Norge 1200.
Page 94: Long Periods Of Inactivity
40#xB0;C to clean the plastic to avoid damage. components of the vehicle. Do not postpone necessary repairs or you may forget them when you take the vehicle out of storage; a general check up is also recommended. use and maintenance Norge 1200.
Page 95
NOTE Place the vehicle on stable Test ride the vehicle at moderate speed supports to keep both wheels off the in an area away from traffic. ground. Cover the vehicle avoiding plastic or waterproof covers. use and maintenance Norge 1200.
Page 96: Technical Data
3600 cc Gearbox fluid 500 cc Transmission fluid 380 cc Fork fluid 400 #xD8; 2.5 cu cm (per leg) Seats Max vehicle load 230 kg (rider + passenger + luggage) use and maintenance Norge 1200.
Page 97
5.5 x 17#x2206; Type METZELER Roadtec Z6 – MICHELIN Pilot Road – DUNLOP D220 ST TYRES Sportmax Front Size: 120/70 – ZR 17#x2206; Inflating pressure: 2.5 atm (250 kPa) Inflating pressure with passenger: 2.5 atm (250 kPa) use and maintenance Norge 1200.
Page 98
12 V #x2013; 10 W (orange) Stop/rear parking lights Instrument panel lighting Number plate light 12 V #x2013; 5 W Turn indicators WARNING LIGHTS Alarm Neutral Side stand down High beam Fuel reserve Antitheft Gear shift indicator use and maintenance Norge 1200.
Page 99: Lubricant Chart
BRAKE 5.1 DOT 4 (the braking system is also compatible with DOT 5). As an alternative to the recommended product, top brand brake fluid meeting or exceeding SAE J1703, NHTSA 116 DOT 4, ISO 4925 specifications for synthetic brake fluid can be used. use and maintenance Norge 1200.
- The Moto Guzzi V7 Racer: Chasing The Ghost Of Steve McQueen – Forbes
- Aprilia, Moto Guzzi Release 2007 American Demo Schedule
- Moto Guzzi Breva 750 review, for sale, parts, top speed, reliability…
- Moto Guzzi Mark 1 Le Mans by Matt Machine – Silodrome
- Moto Guzzi Nevada 750, Follet by Mr. Martini – Moto Rivista
